
Other Miscellaneous Superman Stuff
Making Your Own Superman Costume
The INTRO
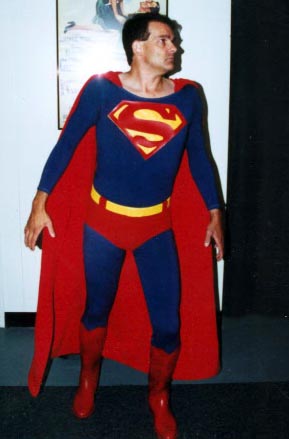 Just before Halloween 2002 I was asked to document the creation of my costume... SUPERMAN! But before I get started on that, we need to keep in mind that costuming, like the art in the comic books, is subject to interpretation. While some things about the costume are sacrosanct (the blue/red/yellow color scheme for example), we are certainly allowed a degree of leeway within those bounds. The trunks must be red, but their cut may vary from low-rise briefs to 'granny panties' if you like. Does the cape go to the ankles or stop at the knees? How big should the size of the "S" be? Just look at the difference in shades of blue between the George Reeves color suit, the Christopher Reeve movie suit and the purple-ish Dean Cain suit of the early 1990s. So, unless you are attempting a replica of a costume that has been shown in the films or a TV show, allow yourself some artistic flexibility.
The BASICS
The thing to remember about all this, is that I don't sew. Because of this, finding just the right basis for the costume is necessary. I therefore ordered my unitard from NYDancewear.com. They offer a selection of colors, cotton or nylon, and styles. They even will retro-custom something for you. Case in point, the collar for Superman is unique. It isn't a crew-neck like on a T-shirt, and it isn't a mock turtle-neck. Nor does it scoop down very far. I had them put a 'boat-neck' collar on the unitard, which was ordered in white cotton. The boatneck collar is low-cut enough to not look like a T-shirt, and high enough to allow me to place the "S" in a proper position. Many of these items can be found at dancewear shops in your area.
The DYING
Basically I used 3 boxes of Rit Dye Evening Blue and half a box of Rit Dye Navy Blue. For the trunks, I just used 3 boxes of red. This is one reason for ordering the unitard in cotton/lycra. The cotton/lycra dyes much better that the nylon. This way, I can choose the color of blue, and not have to accept whatever color blue was available from the factory. Another reason is: I just don't care for the 'shine' that the nylon/lycra give off. Superman's suit just shouldn't be shiny. The 3rd reason for the cotton...it just feels better to wear. The thing to remember about dying fabric is, the color on the box is usually NOT the color you end up with. So do some experimenting before hand.
The TRUNKS & BELT
I have seen costumes where the trunks are attached to the top part of the tunic, and some where the trunks actually have belt loops on them. I tend to prefer to make everything a separate piece. Looks are more important than function. This makes for less work, easier to wear, and a better looking final product. Why can't the trunks just be separate and just pulled over the blue? Sure...that makes things in the men's room a bit more problematic, but it's a small price to pay. So...now you're wearing the basic blue and red and thinking you're looking pretty good. Well, the yellow belt does a lot to break up the colors and adds just the right touch of detail. For this, I found some yellow vinyl at the Wal-Mart fabric area. I can't recall the price-per-yard, but one yard should be enough for the waist that is less than 36". I just cut off a piece that was WIDE enough to cover a leather belt and used a spray adhesive to make it stick. The buckle was cut from "FOAMIES", also available at Wal-Mart (and other fine craft stores). Just cover a piece of cardboard or foamies with the same vinyl and attach it to the belt. Now...the belt actually attaches in the back (since the cape will hide the REAL buckle), and the belt loops are red sticky-backed felt that I just put on the belt. No need for actual loops that will be a big pain. They don't really do anything but look good.
The BOOTS
The proper footwear is perhaps the most difficult part of any superhero costume. Fabric 'boots' just look like socks, and rubber 'work' boots don't have the shape you really want. I have found a black rubber stable/riding boot at Chicksaddlery.com. This boot hugs the calf really well, goes all the way up to the knee, and has a low heel so you don't look like you have on cowboy boots. In fact, I've used the same pair for the last three costumes; The Phantom, Zorro, and now, painted red for Superman. And thereby hangs the important part of any painted boot; the paint. Many years ago, I stumbled upon Plasti-Dip. Plasti-Dip is a rubberized coating that is primarily used to give tools a grippier handle. It comes in a can (for dipping) and a spray. The spray really works the best. It comes in red, black, blue, yellow, and clear. And unlike any other spray paint that will peel off when you start walking, this stuff will stay on the rubber boot. It's like applying another layer of rubber. There are 2 downsides to using Plasti-Dip though. #1, it's very difficult to find (Plastidip.com, but they don't sell direct. Consult your local search engine). #2, when you DO find it, it can be upwards of $9 per 12oz can. Also, allow 2 cans per boot. And for the love of all you find Holy, PLEASE apply in the most well ventilated area you can. I MEAN this one!
The "S" SHIELD
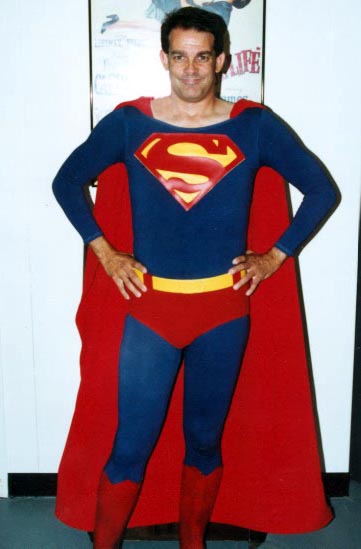 It's a 2-layered effect. I downloaded an "S" graphic from the Internet, and printed it out. Then I determined I wanted it bigger than my printer would print, so off to Kinko's I went to blow it up in size. Once the right size was determined, I cut out the YELLOW area, leaving only the red "S" to be used as a stencil. I traced the pattern onto a piece of FOAMIES, and then cut that out in the same manner. Spraying the red foamie with the Plasti-Dip to help ensure the same color as the boots, I put that over a piece of the yellow vinyl and cemented it in place (rubber cement works OK). Then I cut the yellow around the red, and there's your shield. The "S" shield was adhered to the unitard with foam double-sided tape. It's usually a good idea to put this on while you are wearing the outfit in order to account for proper placement. Mnay people attempt to make the "S" out of felt. This NEVER looks good. It just looks like felt.
The CAPE
The cape was a red polyester for $1 per yard at Wal-Mart. Once the general size was determined, I tapered the neck end with Steam-Seam, which is an iron-on hemming treatment to avoid sewing (made by many companies). Then using the same method, I hemmed the bottom of the cape, but allowed enough room to slide a thin cable into the hem. I then sealed the ends. The cable gives it a more billowous effect so it doesn't just hang behind my legs. Now...the tricky part; I cut 2 holes into the cape to approximate where my arms would be, mindful to be sure that they were shoulder-width apart.Putting my arms through the holes like I was putting on a hospital gown (arms out in front as if "sleep-walking"). I then threw my arms over my head and brought them back around to my sides, sending the cape from in front of me, to behind me (make sure you don't clip a light fixture or potted plant that hangs from the ceiling). Now, you're wearing the cape like a back-pack without needing to tie or sew it to anything. Then just pull the top of the unitard up over the shoulders, and adjust as you wish. The yellow "S" was made the same way as the one on the front, but smaller, and with 2 layers of yellow. A friend applied the cape's "S" since I was wearing it to ensure proper placement.
The EPILOGUE
Naturally, this is not the definitive method of making a costume of this sort. I use methods that work for me, and make decisions accordingly. Should you have any questions about what I've done...or hints that have worked for you, please feel free to send me an e-mail at Andrew12759@AOL.com. And send me pics of your final product.Andrew Miller